
Changing the time on your iPhone 14 is a simple process that involves a few taps within your device’s settings. Whether you’re adjusting for daylight savings, traveling across time zones, or simply setting the correct time, these steps will get your iPhone displaying the correct time in no time.
You can also check out this video about how to change time on iPhone 14 for more information.
Step by Step Tutorial: Changing Time on iPhone 14
Before diving into the steps, let’s understand what we’re aiming to achieve here. Changing the time on your iPhone 14 ensures that your device reflects the correct time, which is crucial for alarm settings, calendar events, and overall time management.
Step 1: Open the Settings App
Begin by tapping the Settings icon on your iPhone’s home screen.
The Settings app is where you’ll find a myriad of options to customize and control your device. It’s represented by a gear icon and is usually found on the home screen or in the App Library.
Step 2: Tap on ‘General’
Scroll down and select the ‘General’ option within the Settings menu.
The ‘General’ section is the hub for many of the foundational settings of your iPhone. Here you’ll find options related to software updates, device information, and, importantly for us, the Date & Time settings.
Step 3: Select ‘Date & Time’
In the General settings, find and tap on ‘Date & Time’.
When you enter the ‘Date & Time’ menu, you’ll be presented with options to set the time manually or automatically, depending on your preference.
Step 4: Toggle off ‘Set Automatically’
If it’s enabled, switch off the ‘Set Automatically’ option to manually adjust the time.
By default, your iPhone may be set to automatically sync its time with the world clock based on your location. Turning this off allows you to have manual control.
Step 5: Set the Correct Time
Adjust the date and time to your desired settings.
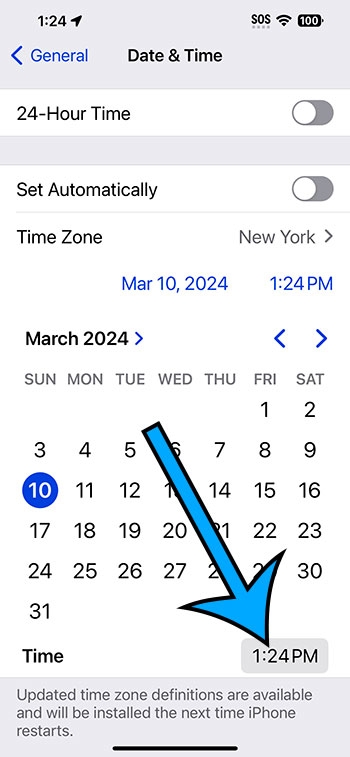
After disabling the automatic setting, you can manually choose your timezone and set the exact time and date by scrolling through the picker.
Once you’ve completed these steps, your iPhone 14 will display the newly set time. This will reflect across all time-based functions on your device, from messages and call logs to events and alarms.
Tips for Changing Time on iPhone 14
- Ensure your iPhone’s software is up to date to avoid any glitches when changing the time.
- If you’re traveling, you might prefer to keep ‘Set Automatically’ enabled for convenience.
- Remember to check if your alarms and calendar events are set to the correct time after manual adjustments.
- Consider syncing your device with iCloud to maintain consistent time settings across your Apple devices.
- If the time keeps resetting, restart your iPhone or contact Apple Support for further assistance.
Frequently Asked Questions
What happens if I can’t change the time on my iPhone 14?
If you’re unable to change the time, it may be due to a software glitch or restriction, such as Screen Time settings. Try restarting your device or adjust Screen Time permissions.
Will changing the time affect my alarms and timers?
Yes, changing the time can affect alarms and timers, especially if you’re setting the time backwards. Be sure to double-check any important alarms or timers after setting the time manually.
Does changing the time manually affect automatic updates for daylight savings?
If you’ve set the time manually, your iPhone won’t automatically adjust for daylight savings. You’ll need to update the time yourself or re-enable ‘Set Automatically’.
Can I set my iPhone 14 to a 24-hour clock?
Yes, in the ‘Date & Time’ settings, you can toggle the 24-Hour Time option to switch between standard and military time formats.
What should I do if the time keeps changing back to the wrong time?
If the time on your iPhone 14 keeps resetting to incorrect settings, ensure ‘Set Automatically’ is switched off. If the issue persists, consider resetting your settings or contacting Apple Support.
Summary
- Open the Settings app.
- Tap on ‘General’.
- Select ‘Date & Time’.
- Toggle off ‘Set Automatically’.
- Set the correct time.
Conclusion
Now that you’re well-versed in changing the time on your iPhone 14, you can confidently manage your device’s time settings like a pro. Whether you’re someone who travels frequently, lives in an area that observes daylight savings, or just needs to correct an out-of-sync clock, these steps will ensure your iPhone displays the correct time.
Remember, managing the time on your device is more than just for accuracy; it’s about ensuring that your entire digital life—from meetings and reminders to messages and social media—operates smoothly and without hiccups. So the next time you glance at your iPhone and see the time isn’t right, don’t fret. You’ve got the knowledge and skills to fix it in a flash!
And for those moments when you’re scratching your head wondering why the time changed on its own, remember the wonders of technology and its automatic adjustments for you. Embrace the convenience, but also know how to take control when needed. After all, in this fast-paced world, every second counts, and your iPhone 14 is there to keep you right on schedule.